We are building a budget arched greenhouse under film on our site

If the answer to the question “Do I need a greenhouse?” is “Yes!”, then this article is for you. After reading it to the end, you will know exactly how to build a budget-friendly film greenhouse with your own hands on your plot, what materials are needed for construction, their exact quantity, and you will even be able to calculate the budget.
DIY Greenhouse – Complete Guide.
Let’s get started… To quickly and affordably build an arched greenhouse (a film-covered tunnel) measuring 3 m x 4 m and 2 m in height, you will need the following materials:
- For the foundation – wooden board: 20 × 150 mm – 14 linear meters;
- For the frame at the greenhouse ends: wooden board 20 × 60 mm – 30 linear meters;
- For the door at the greenhouse end: wooden board 20×40 mm – 7.36 linear meters;
- For the arches (hoops) – technical polyethylene or plastic pipe. Pipe diameter 13 or 16 mm. Quantity: 44 linear meters (7 pieces of 5.71 m + 1 piece of 4 meters for the stiffening rib);
- For the hoops and foundation – rebar 8 mm or 10 mm. If you use a 13 mm pipe for the hoops, take 8 mm rebar, and correspondingly, if you purchase a 16 mm pipe for the greenhouse hoops, take 10 mm rebar. Quantity: 14 pieces of 0.8 m each for the arches and 4 pieces of 0.3 m each for the foundation;
- Greenhouse film manufactured by Planet Plastiс LLC. Quantity: width 6 m x length 10 linear meters. Which specific film to choose from our wide range of greenhouse films primarily depends on whether it will be an exclusively summer greenhouse or if you plan to use it for several seasons, whether your region is windy, and whether you plan to remove the film for the winter. By the way, our article “Properties of Polyethylene Greenhouse Films” will help you choose the right greenhouse film based on the answers to the above questions;
- For securing the film to the greenhouse frame – wooden or plastic laths / slats measuring 50 cm x 4 cm. Quantity: 22 pieces, but it is better to prepare 37 pieces. The thing is, 15 pieces will be used for securing the film in the doorway and directly to the door. Although a heavy-duty staple gun and staples can be used exclusively for this purpose, securing the film with wooden laths is a more reliable and durable method;
- Plastic cable ties (zip ties);
- Staple gun and staples, as well as nails or screws;
- Metal brackets (straps);
- Door hinges and handles.
Note: Wooden elements of the greenhouse must be made of well-dried timber, and must be smooth without sharp splinters, knots, or corners at points of contact with the film. It is undesirable to use softwood timber, even if well-dried, as it can exude resins under the influence of high temperatures. All wooden parts of the greenhouse frame must be treated with protective coatings against rot and fungus. Never use petroleum products to treat the wooden components of the greenhouse.
Step 1 – Installing the Greenhouse Foundation.
Using the 20 × 150 mm boards, we assemble the foundation for the greenhouse, measuring 3 m x 4 m. Make sure that the frame is rectangular by measuring its diagonals. Fix the frame to the ground by driving 0.3 m rebar pins into each corner (150 mm underground and 150 mm above ground holding the wooden foundation frame). 
Step 2 – Installing the Arches (Hoops) of the Greenhouse.
Driving the rebar: Metal rods serve as the base for the greenhouse hoops. Take our rebar rods, of which we have 14 pieces of 0.8 m each, and drive them into the ground along the outer long sides of the greenhouse to a depth of about 40 cm, at an equal distance from each other (about 66 cm). As a result, we have driven 7 rods along the two long sides of the greenhouse. Our rebar rods protrude 40 cm out of the ground. 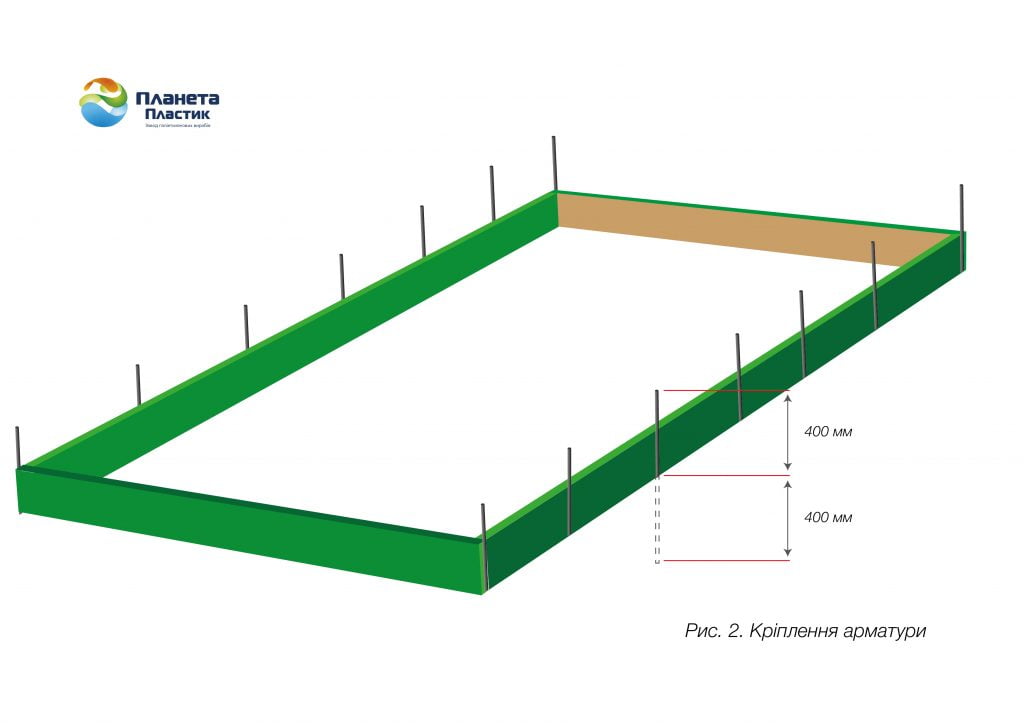 Installing the hoops: Slide the polyethylene or plastic pipes over the rebar rods protruding above the ground surface, forming arches (hoops) across the width of our greenhouse.
  Secure the pipe to the greenhouse foundation boards using screws and short pieces of metal strapping wrapped around the pipe.
Step 3 – Assembling the Greenhouse Ends and Reinforcing the Frame.
Cut the following pieces from our 30 linear meters of 20 × 60 mm wooden board:
- 0.49 m piece – 8 pieces;
- 1.9 m, 1.5 m, 0.4 m, and 0.7 m pieces (for reinforcing the frame) – 4 pieces each;
- 1.0 m piece – 2 pieces;
- 2.96 m piece – 2 pieces (for the base).
And assemble the two greenhouse ends as shown in the illustration below.  Position the assembled structures at the ends of the greenhouse and secure them to the base using nails or screws. To reinforce the greenhouse frame, take our 0.7 m pieces and cut one end of each of these 4 pieces at a 45º angle. Now fix these pieces at a 45º angle to the end wall structure (as shown in the illustration above) and connect them to the greenhouse foundation, thereby strengthening the frame and increasing the stability of our greenhouse ends.
Step 4 – Installing a Stiffening Rib on the Greenhouse Hoops.
Using plastic cable ties (zip ties), secure the remaining 4-meter pipe piece at the highest point of the greenhouse arches (hoops). This will serve as a stiffening rib that must run along the top part of the greenhouse arches. 
Step 5 – Covering the Greenhouse with Film.
To secure the film, you can use wooden or plastic laths / slats measuring 50 cm x 4 cm. Quantity: 22 pieces. With the help of these slats, the film will be attached to the base (greenhouse foundation) between the hoops. Place the film on top of the greenhouse in the center, with a width of 6 m and a length of 10 m, and spread the film over the entire length of the greenhouse. Be sure to verify that there is enough film to cover both the long sides of the greenhouse structure and the end walls completely.  Using the mounting slats, carefully fix the film near the base on one side of the greenhouse. For fixing, you can use a staple gun and staples or a hammer and nails. Then, repeat the procedure on the other side of the greenhouse. Before securing the film, pull it slightly so that it is evenly distributed over the entire greenhouse structure. First secure the film in the middle of the greenhouse frame, and then proceed with securing the film moving toward the greenhouse ends, and so on along the entire length. Do everything carefully, trying not to damage the film. Smoothly stretch the film over the greenhouse ends. Fold the excess film into pleats from the center to the edges and secure them near the base of the greenhouse with wooden slats. At the end wall with the door, cut out the film at the doorway, leaving an allowance of a few centimeters to wrap around the wooden parts of the doorway and secure the film inside the greenhouse. Use wooden or plastic laths / slats measuring 50 cm x 4 cm — 7 pieces will be sufficient, or metal staples and a staple gun. Note: before covering, it is advisable to keep the film at room temperature for 24 hours. Do not stretch the film over the greenhouse to its working state immediately after unrolling the log, especially during the cold season. Keep it unfolded for a few hours. When covering the greenhouse with film, it must be taken into account that insufficient tension increases friction against the frame, accelerating its aging, and also increases the likelihood of wind damage. Excessive tension can cause tearing or damage to the greenhouse frame, as it will contract even tighter after cooling down. Provide a means to adjust the film tension. The optimal air temperature at the moment of covering the greenhouse with film is around 15°C.
Step 6 – Assembling the Door.
Assemble a door for one of the ends. Before cutting the boards for the door, it is essential to check the actual dimensions of the doorway, as they may slightly differ from the intended measurements. This prevents discovering during installation that the size does not fit. If the measurements match the intended dimensions, cut the following pieces from the 20 x 40 mm wooden board:
- 1.73 m – 2 pieces;
- 0.96 m – 2 pieces;
- 1.98 m – 1 piece (stiffening rib for the door — installed diagonally).
Join the pieces together to create a door frame. For door rigidity, install the stiffening rib — fix the 1.98 m piece diagonally across the frame and nail it securely. Attach the hinges to the door frame. Wrap the door with the remaining film and secure it along the inner side of the door frame, for example, using wooden slats (8 pieces will be sufficient), the same ones you used when securing the greenhouse film to its foundation. Alternatively, you can secure the film simply with metal staples using a staple gun. Install the door handles.
Step 7 – Installing the Door at the Greenhouse End.
 Congratulations! You are now the happy owner of a greenhouse built with your own hands. It is just the right time to bring soil into the greenhouse, set up the garden beds, and grow your first harvest. Speaking of beds… practice shows that when working in a greenhouse, it is more convenient if you arrange three narrower beds (one central and two side beds) and two pathways rather than two wider beds. Also remember that not all crops grow well next to each other; our article “Vegetable Companion Planting” contains a detailed table listing successful and unsuccessful combinations of vegetables for cultivation in a single greenhouse. Wishing everyone a rich harvest!